
 |
. |
| |
How do I create a database file?
How do I create a table?
What are the different data types and how are they used?
How do I determine what properties I should
assign to a field?
How do I create relationships between tables?
What is "Referential Integrity" and what
should I keep in mind when using it?
What's the difference between a
"one-to-many" relationship and a "one-to-one" relationship?
What are the different "join types" and how
do they affect the database?
How do I create a form?
What is a query and how do I create one?
What is the syntax for different criteria?
How do I make a calculated field?
How do I create a report?
How do I move/rename my database?
| How do I create a database
file?
Access works differently than other MS Office programs in that it
forces you to create a file before you actually use the program
and it then saves to this file as you work.
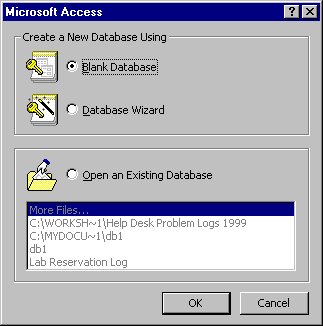
When you first open Access, you will be presented with a dialogue box
like the one to the right. To create a new database, click the radio
button marked "Blank Database." An explorer window will open,
giving you the options of where you want to store the database and what
you wish to call it.
Although it is not necessary, we often suggest that students
initially save their databases to C:\student and then copy the database
to two different floppy disks when their session is over. This is
because Access writes to the file as you work and this can be very hard
on a floppy. The two copies ensure that you have a backup if something
bad should happen to one of the disks and the file gets corrupted.
Access files are much harder to recreate than other types of Office
documents should corruption occur.
|
 |

| How do I create a table?
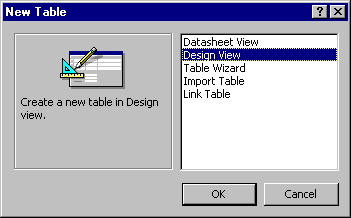
In the database dialogue box, click on the tab marked
"Tables" and click on the button that says "new."
Another dialogue box will open. This box will look like the one to the
right. For Franklin University assignments, you will almost always
choose "design view" at this point. This will create a new
table and then take you to the design view so that you can begin setting
up parameters for the table.
Each field in a table has three "basic" parameters and then
a slew of properties that can be used to further modify and define the
field. The three basic parameters are the field name (which can be just
about anything that helps you remember what the field is for), the data
type (which describes how the data is to be stored), and an optional
description of what the field represents.
|
 |

What are the different data types and how are they
used?
Every field in Access requires that a data type be assigned to it. The
different data types are summarized below:
| Text |
Use this for straight text or for numbers that do not
require calculations to be performed on them such as phone numbers or
social security numbers. The default maximum size of a text field is 50
characters, but this can be lengthened to up to 255 characters by
setting the FieldSize property. |
| Memo |
This is used for text or for numbers that do not
require calculations to be performed on them. The difference between a
the text data types and the memo data type is simply a matter of size.
Memo fields can store up to 64,000 characters. You do not need to set a
FieldSize property for memo fields. |
| Number |
Use this for numbers that you are going to want to perform
calculations on (except for numbers representing money; see currency
below.) |
| Date/Time |
Like the name implies, you use this to store dates and
times. |
| Currency |
Use this for any number that represents money. The
currency data type is specifically designed to be accurate to 15 digits
to the left of the decimal and 4 digits to the right. |
| AutoNumber |
This is often used to create a primary key. The AutoNumber
data type creates a number without the user having to actually input
anything. The numbers can be either sequential or random. |
| Yes / No |
This is used for boolean arguments. Boolean arguments are
arguments that can have only two states, like "yes or no",
"true or false", or "on or off." |
| OLE Object |
Use this option to store a file within the database. The
file can be of any type, including Word Documents, Excel Worksheets,
sounds, pictures, etc. The object file must be less than 1 gigabyte in
size. |
| Hyperlink |
Use this to store a hyperlink. The hyperlink can be either
a UNC (points to a file on the disk) or a URL (points to a file on the
Internet). |
| Lookup Wizard |
Use this to store a lookup field. A lookup field is
generally displayed as a drop box containing the options that you
designate, either manually or as stored in another table. When you
choose this option, a wizard starts that guides you through this
process. |

How do I determine what properties I should
assign to a field?
While it is outside the scope of this FAQ to define and explain every option
for every property that is available for use in Access, there are tools built
into the program to help you determine what these settings should be. Any time
you click in a property option, a short description of the property and helpful
tips appears in blue lettering to the right, as shown below:

Also, Access has made most of these properties multiple-choice by providing
drop boxes listing the valid options for any given property. You simply
determine which option is most appropriate for how you wish to use the data.

How do I create relationships between tables?
First determine what pieces of information are shared between tables.
There should be some field that contains identical information in two or more
tables in order for a relationship to be established. For instance, one
table may include a customer ID number and shipping information like address,
city, state, and zip code. A different table may include the same customer
ID number and accounting information like date of last order, payments, etc.
The relationship in this case would be established between the customer ID
numbers in both tables.
To establish a relationship, click the relationship button ( )
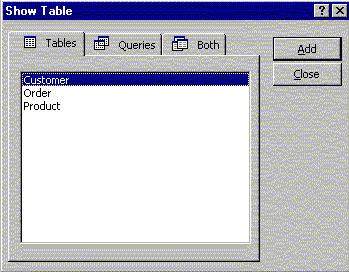
at the top of the screen. A dialog box like the one shown at right
will appear. Add the tables that you wish to establish
relationships among by clicking on the table's name and clicking the
button labeled "Add." Click the button labeled
"Close" when you have added all of the necessary tables. )
at the top of the screen. A dialog box like the one shown at right
will appear. Add the tables that you wish to establish
relationships among by clicking on the table's name and clicking the
button labeled "Add." Click the button labeled
"Close" when you have added all of the necessary tables. |
 |
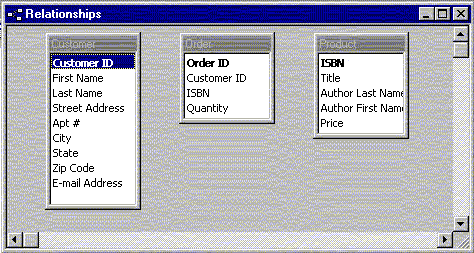
| Next, click on one of the two fields that you want to establish a
relationship between. Hold the mouse button down while
dragging this field name to the other field you wish to create the
relationship with. |
 |
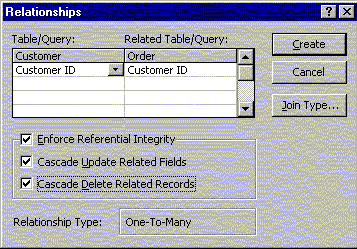
| The relationships dialog box (shown at right) will now open. On
the left side, it lists the field you dragged from (called the primary
table) and on the right side it lists the field you dragged to
(called the related table). At this time, be sure that you
have chosen the correct fields.
There are also three check boxes below the field names that are
labeled "Enforce Referential Integrity",
"Cascade Update Related Fields" and
"Cascade Delete Related Records."
Choose the options that best suit your needs.
Be sure that the join type is set
correctly.
Click on the button labeled "Create."
|
 |
You will see the relationship represented as a thick line between the
related fields. This line will also give you an indication of the
relationship type. (In the example to the right, the "1"
next to the Customer ID in the Customer table and the symbol for
infinity ( ) next to the Customer ID
in the Order table tells us that this is a one-to-many relationship.) ) next to the Customer ID
in the Order table tells us that this is a one-to-many relationship.)
When you close the relationship view, you will be prompted to save
the layout of the relationship view. Bear in mind that
Access has already saved the relationships themselves. This prompt
is merely for saving the way you have the tables arranged in the
relationship view.
|
 |

What is "Referential Integrity" and
what should I keep in mind when using it?
Referential Integrity is the system that Access uses to be sure that
meaningless data is not entered into the database.
If the "Enforce Referential Integrity" box is checked, Access will
hold you to the Referential Integrity Rules.
 | You can't enter a value in the key field of the related table that doesn't
exist in the primary key of the primary table. For example, you can't have
an order that is assigned to a Customer ID that doesn't exist.
 | You can't delete a record from a primary table if matching records exist
in a related table. For example, you can't delete a customer record from the
Customers table if there are orders assigned to the customer in the Orders
table.
 | You can't change a primary key value in the primary table, if that record
has related records. For example, you can't change a Customer ID in the
Customers table if there are orders assigned to that customer in the
Orders table. |
| |
When "Cascade Update Related Fields" is checked,
changing a primary key value in the primary table automatically updates the
matching value in all related records. For example, if you change a Customer ID
in the Customer table, the Customer ID in all related tables will be updated as
well.
When "Cascade Delete Related Records" is checked, deleting a record
in the primary table deletes any related records in the related table. For
example, if you delete a customer record in the Customer table, all related
records in the Orders table will also be deleted.

What's the difference between a
"one-to-many" relationship and a "one-to-one" relationship?
A one-to-many relationship should be established if only one of the related
fields is a primary key or a unique index of some kind. For example, you
would want to establish a one-to-many relationship between the Customer ID field
in the Customer table (a primary key) and the Customer ID field in the Order
table because there will only be one Customer ID in the Customer
table that matches many Customer ID's in the Orders table.
(Each time a customer makes an order, their Customer ID is used.)
A one-to-one relationship should be established if both of the related
fields is a primary key or a unique index of some kind. For example, if
you held shipping information in one table (Customer table) and credit card
information in another table (Credit table) and you allowed only one credit card
to be used per customer, you would want to establish a one-to-one relationship
between the Customer ID in the Customer table and the Customer ID in the Credit
table.
A "many-to-many" relationship is actually two (or more) one-to-many
relationships that Access establishes by creating a third table whose primary
key consists of two fields and the keys from the other two tables. (This
is confusing to read about, but is fairly simple to grasp when you try it in the
program itself.)

What are the different "join types" and
how do they affect the database?
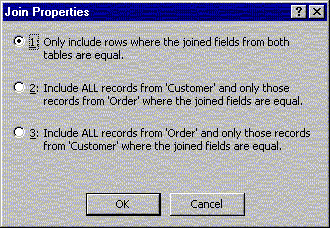
| When you click on the "join type" button while you are
creating relationships, a dialog pop will appear that looks like the one
to the right. Here is where you define the join type of a
relationship.
The default join type ("Only include rows where the joined
fields from both tables are equal") selects only those records from
the joined tables or queries that have the same values in the joined
fields. When the values are the same, the query combines the two
matching records and displays them as one record in the query's results.
If one table doesn't have a matching record in the other table, neither
record appears in the query's results.
On the other hand, when using the second or third join type, each
matching record from the two tables is combined into one record in the
query's results (as they are with the first join type). However, when a
record from the table that's contributing all of its records can't be
matched with a record from the other table, the record still appears
in the query's results, but with empty cells where there was no
matching record from the other table.
|
 |

How do I create a form?
A form is more or less just a more visually appealing way to present the
information that is available and stored in a table. You are able to enter
data from a form, but not delete it. This makes the form the ideal method
of data entry for outside users of your database.
Creating a form is quick and easy with the Form Wizard and extremely
tedious when done in design view.
To create a new form, click on the "forms" tab and then click on
"new".
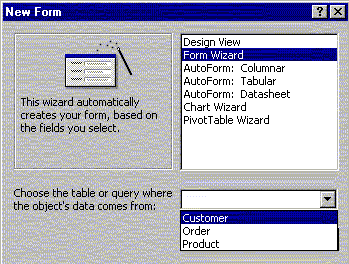
| To create a new form, click on the "forms" tab and then
click on "new". You will be presented with a dialog box
like the one to the right. Click on "Form Wizard" and
then choose the table that you would like to create the form for by
clicking on the drop box below and highlighting the appropriate table
name. |
 |
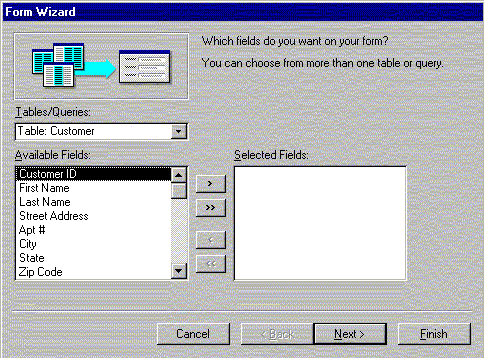
| The Form Wizard will open. Now you simply answer questions about
the information you wish to include on your form.
In the first box, shown at right, you choose the fields that you want
to include from your form. Highlight each field and click the  button to move it from the list of available fields to the list of
selected fields.
If you would like to select all of the available fields, click the  button.
When you have selected the appropriate fields, click the
"next" button.
|
` |
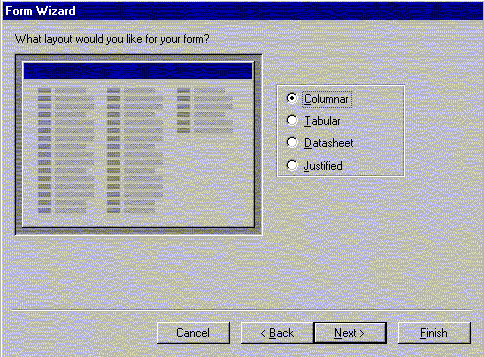
| The Form Wizard will now prompt you to tell it what kind of layout you
would like for your form. As you click through each of the
available options, look at the diagram to the left of the options for a
general idea of what the form will look like.
When you have found a layout you like, click the "next"
button.
|
 |
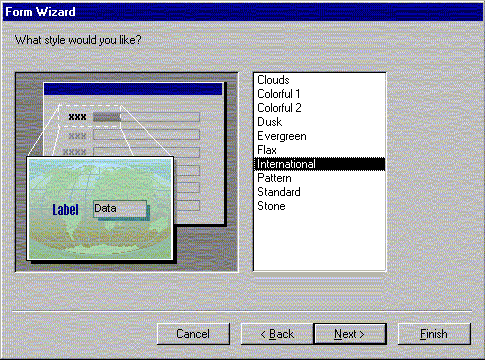
| The Form Wizard will now prompt you for what type of style you would
like for your form. These "canned" styles will add
pizzazz to your forms with little effort.
As you click on the name of each style, a preview of what it looks
like will appear to the left of the style names.
When you have found a style that you like, click on the
"next" button.
|
 |
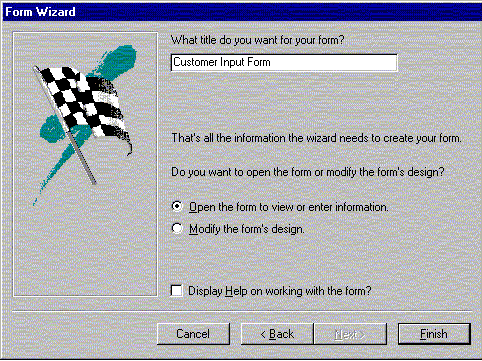
| Finally, the Form Wizard will prompt you for a title for your form.
Click in the text box and enter an appropriate title.
You then have the option of opening your new form to enter data or to
modify the form's design. If you want to add custom touches to the
form, then you can modify its design from here or by highlighting it
and clicking on "design" from the main interface.
When you are done, click "Finish" and the Form Wizard will
create your form.
|
 |

What is a query and how do I create one?
A query is the method used to extract data from the database. When you
create a query, you decide which fields you want returned based on selections
and criteria.
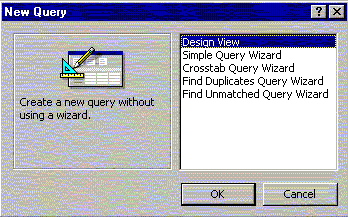
To create a query, first click on the "Queries" tab in the
main interface and then click the button that is labeled
"new."
You will be presented with a dialog box like the one to the right.
Click on "design view" and click the "OK" button.
|
 |
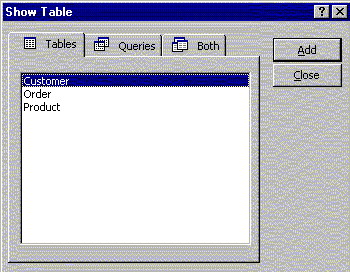
| The first thing you will see is the "Show Table" dialog box.
Here, Access is asking you to tell it which tables will be included in
this query.
For example, if you had a customer's address information in the
Customer table and the purpose of your query is simply to compile a
mailing list, then you would only need to include the Customer table.
Another example would be if the order table contained only a
customer's ID number and the product ID numbers of the products they
ordered. Both ID numbers reference the other tables. If you
wanted to have the output of the query include information such as the
name of a product and the names of the customers that have ordered this
product, you would need all three tables.
To add a table, click on its name and then click on the
"add" button.
|
 |
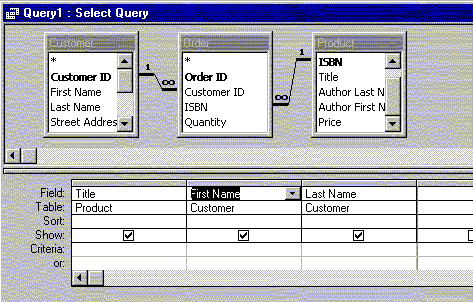
| You will now see the tables that you chose represented in the query
interface. You will also note that any relationships that you have
established are represented here as well.
It is easy to add fields to the query. Simply drag the field
that you want to include down to the field list at the bottom of the
screen.
In this example, we have added the fields "title" from the
product table and "First Name" and "Last Name" from
the Customer table. Notice that the table that the field came from
is listed below the field name. This is extremely useful if you
have repeated field names over several tables.
|
 |
Notice the other options that are available for each query field: sort, show,
and criteria. Each of these has an extremely important role in determining
the results of the query.
"Sort" refers to how the results of the query will be
sorted. To change how a query is sorted, simply click in the box to the
right of the word "sort" in the field column you wish to sort on.
You are given the choice of "ascending" or "descending".
("Ascending" goes from lowest number to highest number or, for text,
in alphabetical order. "Descending" goes from highest number to
lowest number or in reverse alphabetical order. Access reads the sort
modifiers from left to right. So, if we add sort modifiers to both the
"Title" field and the "Last Name" field, our query will be
sorted first by title and then by customer last name.
"Show" refers to whether the field will be displayed when
the query is run. This may sound strange - why would you have included it
in the query if it wasn't going to be shown? Because information is
contained in several tables, some fields act as "pointers" to the
information you wish to include. For instance, you may wish to have a
query that lists all of the orders, but you might not want to include the order
number itself, despite the fact that you wish to use it to reference other
tables.
"Criteria" is the most flexible modifier and is crucial to
the success of many queries. For example, what is you only wanted to
include customers who ordered a specific book? You can do this by typing
the title of the book in the criteria box under "title." Access
will now list only those customers who have ordered that title. There are
many different options available for criteria.
You continually check the results of a query by toggling between the run view
and the design view.
Click  to run the
query and to run the
query and  to
return to the design view. to
return to the design view.

What is the syntax for different criteria?
Access allows you to use many different statements in the criteria box to
achieve different results.
Mathematical
Mathematical operators are the most commonly used in Access queries.
Despite their name, mathematical operators can be used on text field as well.
| Example |
Query Result |
| ="car" |
Returns all records containing only the text "car" |
| =5 |
Returns all records that equal 5 |
| >"car" |
Returns all records that come after "car"
alphabetically. (NOTE: "car" itself will NOT be included.) |
| >5 |
Returns all records that are greater than one. (NOTE: Records equaling
5 will NOT be included.) |
| <"car" |
Returns all records that come before "car"
alphabetically. (NOTE: "car" itself will NOT be included.) |
| <5 |
Returns all record that are less than 5. (NOTE: Records equaling
5 will NOT be included.) |
| >="car" |
Returns all records from "car" to the end of the alphabet.
("car" IS included.) |
| >=5 |
Returns all records that are equal to or greater than 5. |
| <="car" |
Returns all records from the beginning of the alphabet through
"car". ("car" IS included.) |
| <=5 |
Returns all record that are equal to or less than 5. |
| <>"car" |
Returns all records EXCEPT "car" |
| <>5 |
Returns all records that are not equal to 5. |
Boolean
Boolean operators use logic rules as their basis. The boolean operators
are "AND" and "OR." These are used in conjunction with
the mathematical operators.
| Example |
Query Result |
| >5 and <10 |
Returns all records that are greater than 5 but less than 10 |
| "car" or "truck" |
Returns the records that contain only the text "car" or only
the text "truck". |
Wildcards
Wildcards are used to broaden your search without having to use repetitive
"OR" statements. There are two kinds of wildcards: "*"
& "?". "*" denotes any number of characters and
"?" denotes a single character. The command for using wildcards
is "like."
| Example |
Query Results |
| like "c*" |
All records that begin with the letter "c" (i.e. car,
Canada, carnivorous, etc.) |
| like "*c*" |
All records that contain the letter "c" (i.e. car, ice,
fictitious, etc.) |
| like "*s" |
All records that end in the letter "s" (i.e. computers,
carnivorous, etc.) |
| like "c*r" |
All records that start with "c" and end with "r"
(i.e. car, computer, etc.) |
| like "199?" |
All records containing a 4 digit variable with "199" as the
first three digits. (i.e. 1991, 1992, 1993,
etc.) |
| like "1/??/2000" |
All records from the month of January, 2000. (i.e. 1/05/2000,
1/14/2000, etc.) |

How do I make a calculated field?
A calculated field is a special field that you create based on one or more
other fields. For instance, let's assume that you have a field in table
"product" called "price" that represents the price of the
product. Then, in the Order table, you have a field called
"quantity" that represents how many units of this product were
ordered. You don't really need to have a field in any table that contains
the total amount of the order because it can be calculated from these two fields
and included in a query.
In the old days, database designers needed to know the exact syntax to create
a calculated field. Access 97 allows you to create these fields in any
easy point-and-click manner. Access then builds the syntax for you.
To create a calculated field:
First, position your cursor in an empty field and then click the expression
builder button ( ). ).
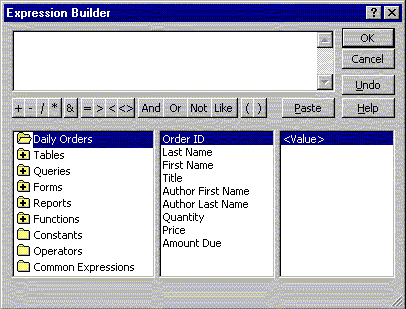
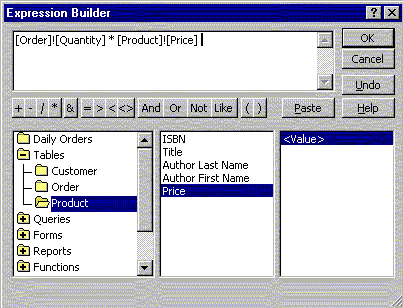
| The expression builder will open, as shown at right. As you can
see, it has a button for each mathematical and boolean operator, a big
blank white text box at the top (where the expression itself will be
located), and three columns at the bottom.
The three columns represent parts of the database. If you
double-click on the "tables" folder, you will see a list of
all of the tables in your database in the left column. If you
click on one of those tables, the center column will become a list of
all of the fields in that table.
|
 |
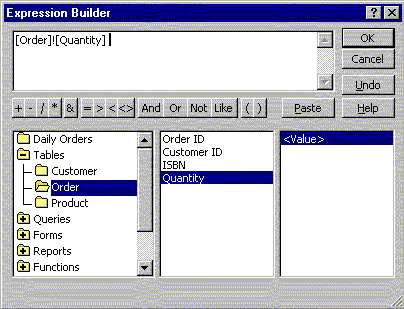
| Double-clicking on the name of the field in the center column will
make that field part of the expression. You can see that Access
has started creating this expression with the syntax "[Order]![Quantity]",
which means "the value of the quantity field in the Order
table". |
 |
| At this point, you want to make sure to tell Access that you will be
multiplying. You can either click on the "*" button or
use the keyboard to enter the "*".
To finish the example expression, we would click on the Product table
and then double-click the "price" field. The resulting
expression is shown at right.
Click "OK".
|
 |
| Access will return to the main query screen. You will notice
your new expression as one the fields. If you click somewhere
outside of the field, Access will show you the beginning of the
expression. It will look like the one shown at right.
"expr1" is the default name for any expression in Access.
This name will be used as the column header in the query as well as the
default label for all reports based on this query. Because
"expr1" doesn't tell us anything about what this information
is supposed to represent, I recommend changing this to something more
meaningful. Simply highlight the word "expr1" and
replace it with something like "total" or whatever you find
more meaningful. DO NOT delete the colon (":") between
the expression name and the expression syntax.
Now you will notice that when you run the query, the total of each
order appears in a column labeled "total."
|

"Expr1" is meaningless...


"Total" makes more sense.
|

How do I create a report?
In the same way that forms are more visually appealing versions of tables, a
report basically takes the results of a query and presents then in an
easy-to-read format.
The easiest way to create a report is to use the Report Wizard. Use the
steps listed in "How do I make a form?" above.
Simply choose the fields that you wish to include and then choose your style.

How do I move/rename my database?
There is no "save as" option in Access, so both of these operations
must be done in the Windows Explorer.
Be sure to close the database before you attempt to move it or rename it.
If you do not close it, data corruption will result.

|
