 |
. |
| |
What are the different views used for?
How do I change the appearance of the text?
How do I add a picture or clip art to a slide?
How do I change a slide animation?
How do I change the background or apply my own
custom background image?
What are the options for printing my presentation?
What are the different views used for?
There are five different ways to view the slides in PowerPoint. These are
accessed by the five buttons in the lower left corner of the screen:  .
The different views are as follows: .
The different views are as follows:
 |
Slide View - This is the view you will want to use when you are
editing individual slides. |
 |
Outline View - A great place to organize your information
before even start decorating your slides. |
 |
Slide Sorter View - An easy interface for changing the order of
the slides, hiding slides, or applying animation across several slides. |
 |
Notes Page View - Allows you to composed speaker's notes to go
along with a slide while you are looking at the slide itself. (Note:
Most of the time, this will default to a very small zoom level.
Use the zoom drop box to adjust this for basic usability.) |
 |
Slide Show View - This view allows you to run through the
presentation exactly as it is saved so far. Often, this is how the
presentation is given, as well. |

How do I change the appearance of the text?
You can control most aspects of the way the text appears on the screen by using
the formatting toolbar:  The
box on the left indicates the font being used. the box on the right
indicates the size of the font. The
box on the left indicates the font being used. the box on the right
indicates the size of the font.
Clicking on the "B" will make the font bold.
Clicking on the "I" will make the font italics.
Clicking on the "U" will make the font underlined.
Clicking on the "S" will make the font  . .
These font modifiers can be used together to create multiple effects on the same
area of text, such as bold italics or bold underlined.
The three boxes with lines on the right indicate alignment options.
To access a larger scope of font options, use the menu: Format - Font.

How do I add a picture or clip art to a slide?
In slide view, use the menu: Insert - Picture. You will then
have the choice of what kind of graphic you would like to insert. To
insert clip art, choose clip art. The Microsoft Clip Art Gallery will open
and you will have many graphics to choose from. (Please note that you
cannot use the World Wide Web option to download more clip art from Microsoft.
This feature has been disabled as part of the security program that runs on all
of the machines.)
To insert a picture from a file, select from file. An explorer will
open and you can browse to find the file you wish to insert. After the
graphic has been displayed within the slide, you can move it to the exact spot
on the slide that you want it to appear. To resize the graphic, use one of
the eight small white boxes that appear around the border when the image is
clicked on. (To make sure that the picture maintains the correct
proportions and is not distorted, use one of the boxes in the corners.)

How do I change a slide animation?
There are a few different ways that this can be done, depending on how
specialized you would like to make your presentation.
If you would simply like to spice up your presentation or would like to broadly
apply an animation across all of the slides in your presentation, then go to the
Slide Sorter View by using the menu: View - Slide Sorter (or
clicking on the  button in the lower left
corner of the screen.) button in the lower left
corner of the screen.)
From here, you can select multiple slides by holding down the shift key while
you click on the slides you wish to change. To apply or change the
animation style used by these slides, use the slide sorter menu:  The
drop box on the right controls the animation effects for the page. Use it
to select the animation that you want to apply to the selected slides. The
drop box on the right controls the animation effects for the page. Use it
to select the animation that you want to apply to the selected slides.
If you wish to assign different animation style to individual elements within
any given slide, you will want to use the animation effects toolbar.
First, go to the slide view by using the menu: View - Slide (or
clicking on the  button in the lower left
corner of the screen.) Activate the animation effects toolbar by using the
menu: View - Toolbars - Animation Effects or by clicking on the button in the lower left
corner of the screen.) Activate the animation effects toolbar by using the
menu: View - Toolbars - Animation Effects or by clicking on the  button in the main toolbar.
The animation effects toolbar has the most popular animation styles built
into it. The easiest way to use it is to click on the element that you
wish to animate and then clicking on the animation style you wish to apply.
Here is a concise explanation of the available styles:

The Animation Effects Toolbar |
|
 |
"Fly From Right" - The text / graphic enters from the
right side of the screen. |
 |
"Fly From Left" - The text / graphic enters
from the left side of the screen. |
 |
"Box Out" - The text / graphic is generated from the
center outward. |
 |
"Flash Once, Medium" - The text / graphic quickly
appears and then disappears from the screen. |
 |
"Fly From Top-Right" (text only) - The text
enters from the top right corner of the screen, one letter at a time. |
 |
"Wipe Down" (text only) - The text appears one
letter at a time. Each letter is generated from the top down. |
 |
"Fly From Top" (text only) - The text enters
from the top of the screen. |
 |
Custom Animation Menu - See the Help Desk for assistance using
this feature. |
|
|

How do I change the background or apply my
own custom background image?
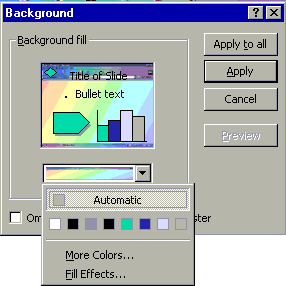
| You can change the background of any given slide in the
Slide View by using the menu: Format - Background.
A dialogue box like the one shown to the right will open. If you
simply wish to change the color of the background, you can either choose
one of the colors that Powerpoint has provided or you can click on More
Colors... to be given the full spectrum of available colors. |
 |
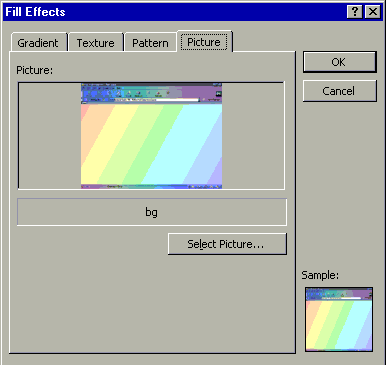
To create customized backgrounds, you will want to click on Fill
Effects. The Fill Effects dialogue box will open, as shown at
right. The four tabs at the top of the box indicate the different
types of effects that you can have for the background.
Gradient backgrounds shift from one color to another over the
course of the background.
Texture backgrounds are full color photorealistc tiled
backgrounds in designs such as marble and stone.
Pattern backgrounds are small two color tiled patterns.
Picture background is a background composed of a file that you
specify by pressing the "Select Picture..." button and
browsing for the appropriate file. |
 |

What are the options for printing my presentation?
Powerpoint has many more print options than the other Office 97 applications.
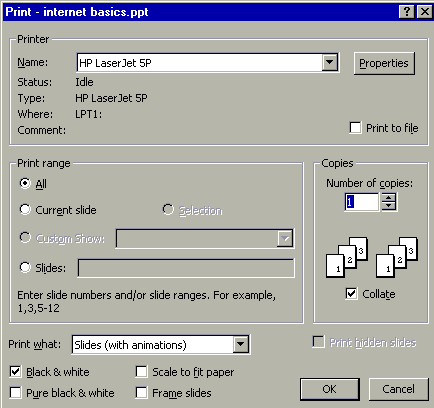
To print, use the menu: File - Print . The print dialogue
box (shown below) will open. 
The available options are as follows:
Printer Name - This is the printer you wish to use to print the slides.
Use "Kyocera" if you want laser prints or "Okidata" if you
want dot matrix prints.
Print Range -
All - Prints all of the slides in the presentation
Current Slide - In slide view, prints the slide that
is currently on the screen.
Selection - In slide sorter view, prints the slide
that have been highlighted.
Custom Show - If you have designated custom shows in
your presentation, you can select which you want to print.
Slides - Allows you to print only the slides that you
designate in the text box.
Number Of Copies - This allows you to choose how many copies you want to
print.
Print What -
Slides (with animations) - This will print one page
for every transition that a slide goes through and features one slide per page
in an extra large format. For instance, if you have a title and two bullet
points configured to appear at separate times, it will print one page with just
the title, one page with the title and the first bullet point, and then one page
with the title and both bullet points. This is a useful feature if you
will be converting the printouts to overhead transparencies or physical slides
and want to maintain the pacing of the PowerPoint presentation.
Slides (without animations) - This will print each
slide (with all of the information from the slide) on a separate sheet of paper
in an extra large format. This is useful if you are making overhead
transparencies from the printouts.
Handouts (2 slides per page) - This will print two
slides per page, arranged vertically.
Handouts (3 slides per page) - This will print three
slides per page, arranged vertically along the left side of the page.
There are lines that can be used to take notes on the right side of the page.
Handouts (6 slides per page) - This will print six
slides per page with not room for note taking. The slides are arranged in
2 columns.
Notes Pages - This will print a medium sized rendition
of the slide at the top of the page with all of the accompanying notes from the
notes view underneath it. This is useful for presenters to print out their
notes, with a handy reference to the proper slide right there at the top of the
page. Each slide uses one page.
Outline - This will print the outline as seen in the
outline view. No graphics are printed.
Black & White - This will print the slides in shades of gray.
In the labs, you will want to check this option.
Pure Black & White - This will print the slides in straight black and
white. No colors. No gray. Use this option if you are using
certain brands of printers that do not allow gray scaling or if you plan to
photocopy the printouts and want to guarantee legible copies.
Scale To Fit Paper - In the labs, this option is not applicable.
Powerpoint defaults to scaling on 8.5 x 11 paper, which is what we use in the
labs. Use this option is you are printing on executive or legal sized
paper.
Frame Slides - Using this option will draw a thin black border around the
slides. This helps to make the slides more apparent.
|

