
 |
. |
| |
How do I double-space my document?
How do I set up the margins?
How do I change the appearance of the text?
How do I center / justify/ etc. the text of my
document?
How do I format the text into columns?
How do I add / modify a numbered or bulleted list?
How do I add characters from a language other than
English?
How do I insert a page break?
How do I set up headers and footers?
How do I add clip art / picture to my document?
How do I add an Excel / Minitab chart to my document?
I added a picture to the document, but it won't
"go" where I want it to. How can I fix this?
How do I draw a line (arrow, word balloon, shape, etc.)?
How do I add a hypertext link to my document?
How do I check the grammar / spelling in my document?
Is there an easy way to make a resume (letter, fax cover
sheet, etc.)?
How do I print only one page of my document?
How do I double-space my document?
If you have already typed your document and now wish to apply
different settings, you must first highlight the text that you wish to
modify. (If you haven't started typing yet, you don't need to
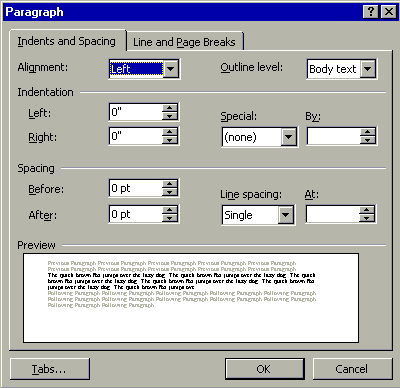
worry about this.) Use the menu: Format - Paragraph.
A dialogue box will open like the one at the right.
To double-space your document, use the drop box labeled "Line
spacing" and select "double."
You will notice that any changes you are planning on making are
displayed in the preview window at the bottom of the dialogue box.
This can aid you in determining the effect these changes will have on
your document.
|
 |

| How do I set up the margins?
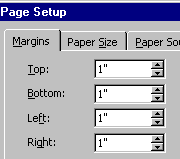
Use the menu: File - Page Setup. A dialogue box like the one to the
right will appear. Click in the text boxes that correspond to the margin
you wish to set and either type in a new value or use the tiny up and
down arrows to adjust the value.
|
 |

How do I change the appearance of the text?
You can control most aspects of the way the text appears on the screen by using
the formatting toolbar:  The
box on the left indicates the font being used. the box on the right
indicates the size of the font. The
box on the left indicates the font being used. the box on the right
indicates the size of the font.
Clicking on the "B" will make the font bold.
Clicking on the "I" will make the font italics.
Clicking on the "U" will make the font underlined.
Clicking on the "S" will make the font  . .
These font modifiers can be used together to create multiple effects on the same
area of text, such as bold italics or bold underlined.
The three boxes with lines on the right indicate alignment options.
To access a larger scope of font options, use the menu: Format - Font.

How do I center / justify/ etc. the text of
my document?
If you have already typed the text you wish to realign, you will need to
highlight it. (If you have not yet begun typing, you can skip this.)
Use the alignment buttons on the formatting toolbar. (If you do not see
these buttons, activate the formatting toolbar by using the menu: View - Toolbars
- Formatting.)
 |
Text is aligned on the left side of the page. (This is the
default setting). |
 |
Text is centered on the page. |
 |
Text is aligned on the right side of the page. |
 |
Text is justified across the page. |

How do I format the text into columns?
If you have already typed the text you want in columns, highlight it. Use the
menu: Format - Columns. This will open a dialogue box that has many options for
how you want your columns formatted. Pay particular attention to the last (often
overlooked) item that reads "Apply To." It is here that you make the
choice between applying the column format to all of the document or just a
portion.

How do I add / modify a numbered or bulleted list?
If you have already typed the list, then highlight it.
For a numbered list, click on the  button.
Word will automatically increment the number every time you hit the enter key.
After you have typed in the last item on the list and hit enter, hit the button.
Word will automatically increment the number every time you hit the enter key.
After you have typed in the last item on the list and hit enter, hit the  button
again to turn off this feature. You can also automatically call up this feature
by simply beginning a numbered list by typing in the first number. Word will
automatically take over the function from there. button
again to turn off this feature. You can also automatically call up this feature
by simply beginning a numbered list by typing in the first number. Word will
automatically take over the function from there.
For a bulleted list, you would use the  button. button.
To change the type of numbering system in use or to change the style of the
bullet being used, place the cursor anywhere within the list and use the menu:
Format - Bullets and Numbering. A dialogue box will open that gives you the
available options.

How do I add characters from a language other than
English?
To add certain international characters to your document, use the menu: Inset
- Symbol and choose the letter you want to add in.

How do I insert a page break?
To insert a page break, use the menu: Insert - Break. The
radio button for page break is highlighted by default. Click on
"OK" to apply the page break.

How do I set up headers and footers?
To add or change text in the headers and footers of your document, use the menu:
View - Header and Footer. Word will then allow you to edit
the content of the headers and footers. You can type information directly
into the header/footer or you can use one of many automatic features that are
built into the Header/Footer toolbar that will appear:
 |
Page Number - This inserts the current page number. |
 |
Number Of Pages - This inserts the total number of pages in the
document. |
 |
Format Page Number - Use this option to change page
numbering features like how you want the number to appear and what
number you would like to start numbering at. |
 |
Insert Date - This will automatically insert the date. |
 |
Insert Time - This will automatically insert the time. |
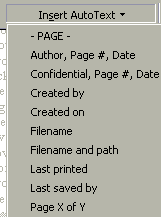
There are also many nice bits of autotext that you can insert by using
the drop menu labeled "Inset Autotext" as shown at right.
-PAGE- will insert the page number in the format shown.
(Ex.- page one will be displayed as "-1-")
Author, Page #, Date - will put the registered user's name on the
left, the page number in the center, and the current date on the right.
Confidential, Page #, Date - will put the word
"confidential" on the left, the page number in the center, and
the current date on the right.
Created By - will put the words "Created by" followed
by the registered user's name.
Created On - will put the words "Created on" followed
by the current date.
Filename - will display the name of the file.
Filename and path - will display the full MS-DOS path of the
document.
Last Printed - will display the last date on which the document
was printed out.
Last Saved By - will display the name of the user who last saved
the document.
Page X of Y - Will display the page number in the format shown.
(Ex. - page one of a ten page document will be displayed as "Page 1
of 10". |
 |

How do I add clip art / picture to my document?
Images like pictures or clip art can help spice up a document or can be used to
clarify a point. To add an image, use the menu: Insert - Picture.
If you want to add clip art, choose clip art and a dialogue box will open that
you can use to select the clip art you want to use. If you want to use a
file from a floppy or the hard drive, select picture. An explorer window
will open and you can browse to the file you wish to use.

How do I add an Excel / Minitab chart to my
document?
Just about any output from another program can be copied into Word.
First, go to the program you wish to copy from. Highlight the
information, chart, or graph you want to use in your document and hit Ctrl+C or
use the menu: Edit - Copy.
Go back to Word and either hit Crtl+V or use the menu: Edit - Paste to paste
the information into Word.

I added a picture to the document, but it
won't "go" where I want it to. How can I fix this?
Word has many options for positioning an image in a document. Word is
defaulted to leave white space to the left and right of the image. Often,
this is not how you want it to appear. To access the options for image
placement, click on the text wrapping button ( )
. (This button is part of the picture toolbar. The picture toolbar
should open automatically any time you click on an image. If it doesn't,
you can use the menu: View - Toolbars - Picture to open it.) )
. (This button is part of the picture toolbar. The picture toolbar
should open automatically any time you click on an image. If it doesn't,
you can use the menu: View - Toolbars - Picture to open it.)
"Text Wrapping" describes how the text should look in conjunction with
the image. Here are descriptions of each of the options:
 |
No matter what the shape of the clip art or picture is, this option
will cause the text to wrap around it in a rectangular shape. |
 |
This causes the text to tightly wrap around clip art that has a
unique, non-rectangular shape. You can influence how this looks by
editing the wrap points. |
 |
This will wrap the text tightly around the outside of the image.
If the image has a "hole" in the wrap points, it will also
insert text there. Most of the time, however, this option behaves
exactly like "Tight" above. |
 |
This will cause Word to disregard the image and display text as if it
weren't there. This is handy is you have a light image that you
wish to use as a faux watermark. |
 |
This is the default setting. It will cause the text to separate
and appear above and below the image with no text to the right or left
of the image. |
When you add a picture from a file, Word does not have wrap points to go by,
so the first thing that you need to do is to assign them. Use the  menu option to do this. Merely clicking on the picture and choosing this
option gives the image a rectangular set of wrap points, represented by the red
squares around the image. You can manipulate these points to get the text
to wrap how you want it to. Only after these wrap points are set can
you change the text wrapping options.

How do I draw a line (arrow, word balloon, shape,
etc.)?
Word has some basic drawing tools built in. These tools are accessed using
the drawing toolbar, shown below:

Below you will find explanations for the most popular drawing tools:
 |
AutoShapes are useful little drawings that commonly appear
on documents. Clicking this button calls a menu allowing the user to
select from a large variety of items, including flow chart shapes, block
arrows, and callouts. |
 |
Clicking this button will allow you to draw a line
anywhere on the page. |
 |
Clicking this button will allow you to draw an arrow
anywhere on the page. |
 |
Clicking this button will allow you to draw a rectangle
anywhere on the page. |
 |
Clicking this button will allow you to draw an oval
anywhere on the page. |
 |
Clicking this button will allow you to draw a text box
anywhere on the page. A text box is simply a rectangle with text inside
it. |
 |
Clicking this button opens up the word art application.
Word art is a quick way to make neat customized logos and banners in an
easy to use interface. |

How do I add a hypertext link to my document?
A hypertext link is a line of text that can be clicked on to be
transported to another area of the document, a different document, or a
page on the World Wide Web.
Before you create a hyperlink, you first need a target for that link.
If you are linking to a web page, the target would simply be the URL of
the page. If you plan on linking to a Word document, you will want
to establish the target in the document yourself.
To create a target, highlight the text that you want the hyperlink to
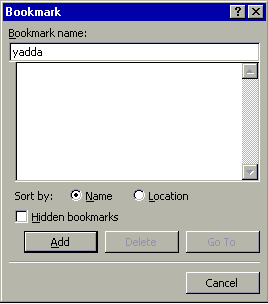
jump to and use the menu: Insert - Bookmark.
A dialogue box like the one to the right will be displayed. Make
up any name that makes sense to you and enter it into the text box.
When you are done, click "Add" and close the dialogue box. |
 |
| To create the hyperlink, highlight the text that you want to be able
to click to go to the bookmark you just established or to the web page
you have chosen.
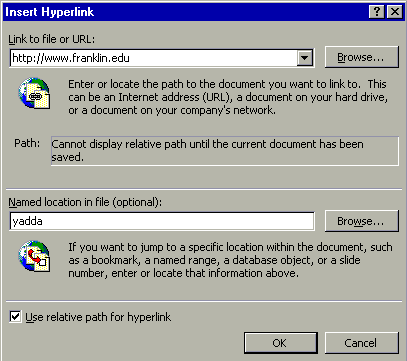
Use the menu: Insert - Hyperlink. A dialogue box
like the one to the right will open. You can either type in the
web address or named location you want to link to, or you can use the
"Browse" button to open an explorer to help locate it.
Then, simply click "OK."
The text that you hyperlinked will now be displayed blue
and underlined. This helps
indicate that it is a hyperlink.
|
 |

How do I check the grammar / spelling in my
document?
| Use the menu: Tools - Spelling and Grammar (or hit the F7
key). Word will then scan your document and point out the spelling and
grammar errors. You will be prompted on whether you wish to keep the
spelling / grammar "as is" or to correct it using the
suggestion provided by Word.
Word is also defaulted to correct minor spelling errors as you type.
For instance, "the" will always be corrected to
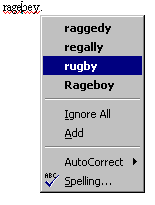
"the." More complex spelling errors will be underlined in red.
To check a single word, right-click on the word and choose the correct
spelling. This use of the spell-check is illustrated at right.
A word to the wise: the grammar checker in Word, as advanced as it
is, is not perfect. Use your judgment and carefully read the
"errors" the program finds.
|
 |

Is there an easy way to make a resume (letter, fax
cover sheet, etc.)?
Yes. The wizards and templates that come packaged with Word can guide you
through the creation of certain types of documents without having to worry about
manually formatting the entire document.
To access the templates, use the menu: File - New. You will be presented with
all of the templates that the lab has, organized by category. Templates whose
name contains the word "wizard" are advanced templates that will
actually walk you through the creation of your document step by step.

How do I print only one page of my document?
To print only one page of a multi-page document, use the menu: File-Print.
One of the options listed is "Print Range." To print only one page,
enter the page number in the text box next to the label "Pages."
|
